
Configuring the Email Print workflow
When you add a new printer to your PrinterOn service, the PrinterOn server automatically assigns the printer an email address. Users can email the printer directly to print email messages or attachments.
To configure your server to accept email print jobs, you will need to configure some settings for your mail service.
When configuring your mail service, it is important to know before configuring what method your service will use to connect to the mail server. The PrinterOn Server supports the following email systems:
The PrinterOn Enterprise Server uses the standard SMTP protocol for sending emails for IMAP4 installations.
Note: For information on incorporating email printing into your existing mail system deployment, see Configuring your mail server for Configuring your mail server for PrinterOn email printing.
📘 Instructions
To configure your email print workflow:
In the Configuration Manager, click Workflows > Email Print.
Email Servers: List of the existing email connections used by the PrintAnywhere server to print the jobs.
Edit: Open the Edit Server dialog box to edit details for an existing Email connection configuration.
Delete: Removes the selected Email connection from the list of existing connections.
Connect: Connect the existing email connection to print the job. Connect will work only for Gmail/Microsoft. When you click on the connect it will redirect you to the Gmail/Microsoft Login page, after authenticating with your login cadential it will call the callback API (Redirect URI), call back API redirect to the PAS-Email page and it will update the PAS Email connection email address and Token.
Enable Indicates which email connection is used for processing print jobs.
To configure your inbound service settings, choose the ADD Email used by your organization.
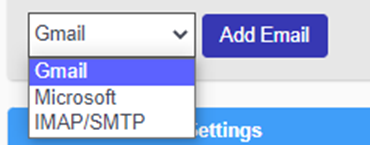
The configuration panel for the selected service appears, allowing you to set service-specific settings:
If you configured the server to use IMAP/SMTP, Configuring the SMTP Server for outbound messages.
Configure any advanced email print settings, if necessary. For example, you can set the minimum size for an attachment.
Note: The Advanced Email Settings panel is displayed in Advanced view only
Click Apply Settings.